Introduction to Unix
In this course, you will do most of your work inside a Jupyter notebook running on the course server. The course server that runs the Jupyter system you are using, however, is itself running on a (virtualized) Unix system, essentially in the cloud. In addition, since you will need to read and write data, you will be directly working with the Unix filesystem. Finally, since you will likely work on cloud systems, either explicitly or implicitly, in your future career, it is prudent to learn the basics of Unix in order to be more proficient.
The Unix operating system is a complex technology that underlies many current operating systems, including both Linux and Mac OSX. In this lesson, we will briefly review basic Unix concepts:
- the Unix Shell,
- the Unix filesystem,
- file permissions,
- how to work with directories and files,
- anonymous file downloads, and
- how to view the contents of files.
In this course, you can work directly at the Unix command prompt by opening a terminal window from your course Jupyter server, or execute the commands in a Notebook code cell by prefixing them with an exclamation symbol, !. This notebook will demonstrate both approaches, the former through screenshots (which might look slightly different than your server) and code cells.
The Unix Shell
A standard Unix system provides a command-line interface to allow a user to interact with the underlying hardware. While this may lack the ease of use most modern graphical operating systems provide, a command line has several benefits:
- Flexible and powerful access to the underlying hardware
- Interactions are identical between local and remote hardware
- Commands can be connected or their input/output redirected
The standard command-line interface on a Unix system is provided by a program called a shell. While several different shells exist, one of the more popular is the Bash shell, which is what we will use by default in this course.
A shell allows a user to run (multiple) programs, to redirect the input and output from programs, and to connect programs together by using pipes. They also allow a user to move around the filesystem, and to automate basic processing by writing small programs known as shell scripts.
Commands are entered at the shell prompt. In this course, we have one primary shell prompt, the JupyterHub server terminal prompt, which is something similar to
data_scientist@temp_host:~$. Unix based operating systems, like Linux and Mac OSX, include terminal applications that can be used in much the same manner as the JupyterHub server command prompt.
Any commands you enter will include the relevant prompt to help clarify where you should enter the command text.
The Unix Filesystem
The Unix filesystem provides for data storage and retrieval from the underlying hardware, as well as interprocess communication through pipes. The Unix filesystem is based on a single rooted tree model. The root of the tree is known as the root directory, and is denoted by the / character. Sub-directories branch off from this root directory to form the entire filesystem hierarchy.
Files and directories have owners and groups (for example, I am the owner of this lesson, but the entire class will have group access). A special owner is known as root, or the superuser. If you have sufficient privileges, you can switch to the superuser by using the sudo command. Each entry in the file system has a permission mask that specifies what the owner, the group, and the entire world (or all) can do to the particular item.
For example, in our Jupyter server terminal we have the following root directory:
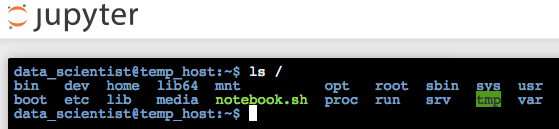
listing a number of standard directories, including bin, dev, home, usr, var, and lib subdirectories. Inside each of these directories can be additional directories or files, thus forming the entire tree-like structure. To list these directories, we use the ls command.
ls
This command is used to list the contents of a directory. The directory is supplied as a parameter, for example to list the contents of the root folder:
$ ls /
The ls command takes a number of different parameters, two of the more useful parameters include
-ato list all files and directories. Any entry with a.or dot as the first character is by default hidden when listing the contents of a directory.-lto list the long format of each entry. This is useful to see the permissions and owner of a directory or file.
In your Jupyter server terminal, you can display the full listing for all files in the /usr directory.
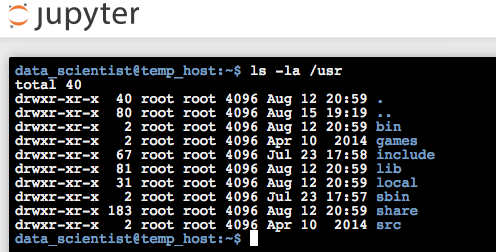
In this listing, the first two entries show the current directory, indicated by a single . character, and then the parent directory, indicated by two . characters. After this the full directory listing is shown in alphanumeric sorted order.
Student Exercise
In the empty Code cell below, execute a directory listing command that shows the full listing for all files in the root, or /, directory. Recall that Unix commands should be preceded by an exclamation mark, !, to be executed within a Jupyter Notebook code cell.
File Permissions
In a long directory listing, the first column specifies the mode and permission in a specific order: muuugggaaa
m stands for the mode, which can be d for a directory or it can be empty, indicated by a - character for a file. Other modes are more advanced (and beyond this lesson), and include a link, a pipe, or a socket; for example, an l indicates a link.
The next segment contains three triads, or permission groupings for user (u) specific permission, group (g) specific permission, and world or all (a) specific permissions. There are three types of permissions available: read, write, and execute, and they are listed in that order. If a permission is not granted, it is indicated by a - character in the relevant position. So -rwxr-xr-x means the entry is a file that can be read, written, and executed by the user, but only read and executed by the group to which the file belongs or by anyone who can access file. Unix file permissions can be confusing, but with practice will begin to make sense.
The owner, group, and permissions can be changed for an item by using the chown, chgrp, and chmod commands. Each of these commands can take -R as a flag to indicate that the operation should be performed recursively if the item is a directory. This will change every sub-directory or file contained within that directory or sub-directory.
chown
This command is used to change the owner of a file or directory. May require superuser privileges. For example, to change the owner of myfile to user rb:
$ chown rb myfile
chgrp
This command is used to change the group of a file or directory. May require superuser privileges. For example, to change the group of myfile to group www:
$ chgrp www myfile
chmod
This command is used to change specific permissions of a file or directory. May require superuser privileges. For example, to change the permissions to allow anyone to read myfile:
$ chmod a+r myfile
Note this command also can use octal notation to specify the target permission, which is more compact, but sometimes more susceptible to user error.
In our Jupyter server terminal, we only have the root user and root group, thus we can't try out the first two commands; however, we can change file or directory permissions.
Unix File System Commands
There are a number of Unix commands that we can use to view, move, create, and change files and directories. Some of the more useful ones include:
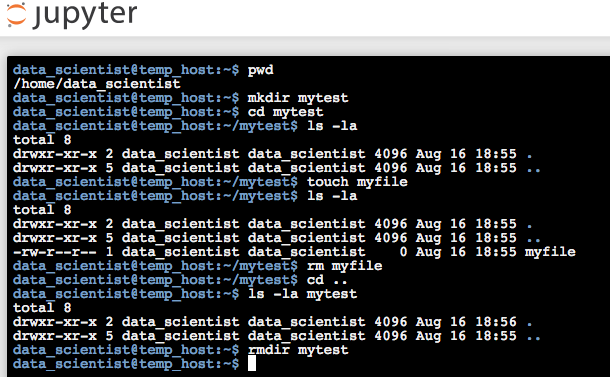
pwd
This command is used to find out the name of the current working directory.
$ pwd
cd
This command is used to change the current working directory. If a directory is specified, we change to that directory, otherwise we change to the user's home directory. Directory names can be absolute (starting with the root directory, or /) or relative, where we use two . characters to signal the parent directory of the current directory (one . character represents the current directory):
$ cd /notebooks
$ cd ..
touch
This command is used to make a new, empty file, with the name specified on the command line. For example to make a new, empty file called myfile:
$ touch myfile
mkdir
This command is used to make a new directory, with the name specified on the command line. Note that this might require superuser privileges. For example, to make a new directory called mytest:
$ mkdir mytest
rmdir
This command is used to remove an empty directory. Note that this might require superuser privileges. For example, to delete a directory called mytest:
$ rmdir mytest
rm
This command is used to remove files or directories. To forcibly remove all entries (including non-empty directories) you can use the -rf flag. For example, to remove myfile:
$ rm myfile
Warning: Removing files or directories at the Unix command prompt is permanent!
Student Exercise
In the empty Code cell below, complete the following tasks:
- Create an empty file named analytics.txt.
- Display the full listing of this file only.
- Change the permission on the file to be
-rwxrw-r--. - Display the full listing of this file only to verify the permissions have changed.
- Delete this file.
Note that you can place multiple Unix commands in a Jupyter Notebook code cell, just place one command per line, and precede each command by an exclamation point, for example !ls.
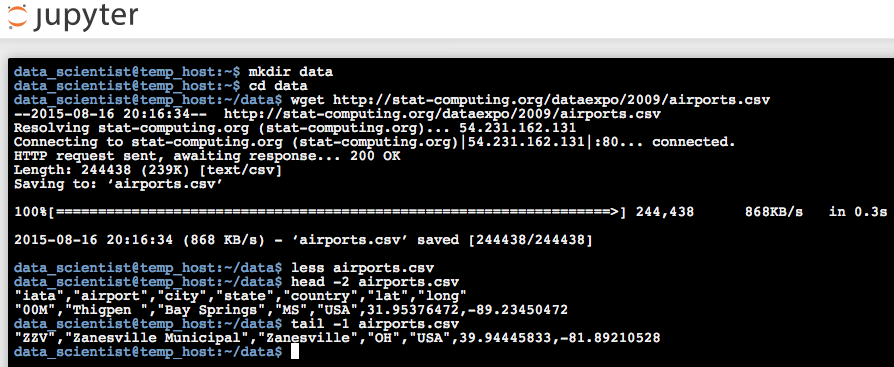
Anonymous File Download
In many instances, we simply want to grab a file (or files) from an Internet resource, like a website. The simplest command to grab a file from a website is the wget command. When given a URL to the desired resource, wget will retrieve the file and save it locally.
$ wget http://w3c.org
wget is a powerful program with many options. For example, wget can recursively download an entire directory structure (which can be dangerous as you can easily fill up your available disk space!).
Viewing Data
An important task that you will need to learn is how to view the contents of a file. In a graphical interface, you might open a document editor, such as a word processor, and load the file into your editor. At the command line, however, we simply use a Unix command to open a file for reading and to display the contents of a file to stdout, which is generally the screen.
Several commands are useful for viewing files:
cat
This command is used to view the entire contents of a file. For example, to send the contents of myfile to stdout, which in this case is the terminal display:
$ cat myfile
less
This command is used to view the contents of a file, one screen at a time. Additional options are available that can be changed while viewing the file, providing a lot of flexibility. less is a more recent version of the more command, which can also be used. For example, to page through the contents of myfile (using the spacebar to go to the next screen, or the b key to go back one screen):
$ less myfile
head
This command is used to view a limited number of lines from the start (or head) of the file. By default, the first 10 lines will be displayed, but you can specify the exact number by using the -n num flag, where num is the number of lines to display. For example, to display the first five lines from myfile:
$ head -5 myfile
tail
This command is used to view a limited number of lines from the end (or tail) of the file. By default, the first 10 lines will be displayed, but you can specify the exact number by using the -n num flag, where num is the number of lines to display. For example, to display the last three lines from myfile:
$ tail -3 myfile
Another useful option for the tail command is the -f flag, which can be used to display the last lines of a file that might be continually updated (e.g., the output of another command).
We can demonstrate several of these commands by first grabbing some data (by using the wget command, which is an optional command in this course) and viewing part of the data.
Ancillary Information
The following links are to additional documentation that you might find helpful in learning this material. Reading these web-accessible documents is completely optional.
- A UNIX Tutorial for Beginners
- The Linux Command Line (PDF)
- Introduction to Linux, a hands on guide.
- A Bash Shell Programming Introduction
- Wikipedia page for
wget
© 2017: Robert J. Brunner at the University of Illinois.
This notebook is released under the Creative Commons license CC BY-NC-SA 4.0. Any reproduction, adaptation, distribution, dissemination or making available of this notebook for commercial use is not allowed unless authorized in writing by the copyright holder.